15 more weeks until I graduate. My last semester starts on Monday and I've practically gotten nothing finished beyond, Christmas Preparation, Storing all Christmas decorationa again, and a little more organization in the Master Bedroom.
It's snowing pretty badly today, but I need to go out and get a new journal for class, I can't scrapbook interesting images from the magazines I've got waiting. Believe it or not these journals are still part of our grades and I'm in a mess of what I need to do during my day without one. My husband doesn't understand that I feel like I'm in limbo without one, because he doesn't use this method.
I've got 3 ideas out of 10 needed for class of possible logos...sigh. I just haven't had time to sit down and brainstorm. Though I do have an idea for the designs for decorating dinnerware, so that's a good thing.
My last textbook isn't here and it won't be here until 2 weeks into the semester, this is very disconcerting. I only feel comfortable when I walk into class with everything needed for that class. It's one of my few quirks. I know I have to get out of this safe zone because I know my designs will feature parts that I will need to research and not have always at my finger tips.
I'm going to have to further add to my portfolio in print and online on Sunday, as well as get a good start on the journal. I've got my time on the TTC subway to do some work if it's not too crowded and I've finally got my cell phone set up to use the internet and such. That I can only use during my above ground sections of my trip back and for to school.
Monday I've got Interior Decorating and Communications Classes so hopefully I'll be able to take the English Text into school and leave it in my locker as I'll have time after class to read it before going home. As my classes end at 1:30 pm and I won't have to deal with interruptions at home while reading.
I'm actually looking forward to this semester, but I won't be comfortable until that last textbook is in my hands.
Until later everyone.
Saturday, January 8, 2011
Sunday, January 2, 2011
Organizing Slow Down
So much for my final push to organizing. I'm now typing with one hand, because I've injured my right shoulder somehow. This annoys me to no end and it happened after my doctor left for the day and he's off tomorrow all day. I'm not sure what's going on but it hurts from my shoulder blade to my wrist.
However, I have purged my magazines, assembled a new bookcase, unpacked three totes of books, found homes for my textbooks I want to keep (though it's not athetically pleasing yet, but it will get there).
I've still got to organize the linen closet and the Master Bedroom closet, then everything will be much less disturbing to me. I like to be able to move easily and at least know where everything is.
Then I'll be able to get back to what needs to be done for the textural nursery perspectives, my portfolio, finish reading the Photoshop book I bought and catch up on my magazine reading.
Saturday, January 1, 2011
New Years Goals

photo from: successforgoalsetting.com
I keep hearing that writing down your goals for a coming year will increase the chances of your fulfilling your goals and not abandoning them. So I figure I'll write them here so that my readers can understand that my life and business twine into one. With this unique perspective I find many see it as a bad thing and worry that my priorities are higher in other places.
I live a life different to most. My husband and I have basically switched the traditional roles, however, many employers believe my son will take me away from my work. I've actually had an employer's wife say this to my face when I said I was pregnant. This is the farthest thing to the truth. My husband and his mother are here if my son needs a parent when he's at school or ill. I'm the one that goes out to work, while my husband who's blind is our stay-at-home parent. No one expects a father to come flying home every time their child goes to the principal's office, so why figure I'm going to need to drop everything?
In this age you would think that this would be something commonly accepted, however, I've found that it's not.
So on to my goals for the New Year:
1) Finish my diploma course in Interior Decorating in April. This will be my last semester.
2) Finish assembling my first portfolio. This I started just before my camera took it's fateful fall, but with the new camera I believe I'll be able to get even better photos soon. I'm also working on perspective drawings for the textural nursery and changing over some of my presentation workbooks to jpeg files from pdf files.
3) Find a position within the Interior Decor Field. It's my dream to offer my keen understanding and sensitivity about special needs families to a firm. With people aging in place and more "special needs" people proving yet again, that with courage and a willingness to do a few things different, that we all can expect the same things from life.
4) Continue blogging about how current design fits or doesn't fit within families with special needs. There are so many things out there that are changing and many of them are actually great, however, I've seen some pretty badly laid out public spaces.
5) Finally have my sinuses operated on and get my stomach dealt with so that they won't interfere with my work and life anymore. I am sick of being sick and won't take it anymore.
6) Take my son on a vacation this summer. I haven't been on a vacation since my honeymoon 12 years ago. I think we all deserve it.
That's the goal to begin the year with. They may seem small, but I want to be practical rather than over extending myself and disappointing myself and those around me.
Right now, my goal today is to organize the Master Bedroom, by assembling a bookcase, getting the last of my packing unpacked (4 years later) and hopefully getting more space to move. I'll be giving space for reference materials and my portfolio I hope also, but we'll see how much will fit. I'm afraid personally I grew up in a place where the furniture out weighed the amount of people. (I dread inheriting that house and clearing it out. However, on the bright side it will make an excellent before and after house.) I admire those that can live minimalist lives, but I have a hard time planning things when I have nothing to do it with. I plan ahead and like things at my finger tips. But today the Master Bedroom is now just a dumping ground for things that don't have homes yet and I can't live like that. So in comes the New Year and on to the final push on the last of the organization in my life.
I Hope Everyone Success in the New Year!
Thursday, December 30, 2010
Textural Nursery Begins To Form Again
The Textural Nursery
This nursery isn't just created for someone that's stuck on colour schemes or themes. It's the basis for creating a purposefully functional space for a blind parent and their family. Many of the things here will help others whom find out suddenly babies do not belong in the same sentence as organized, predictable or simple.

This is the beginning of the Textural Nursery. Created in AutoCAD 2011 Student Edition and edited within Photoshop into a .jpg.
This simple floor plan is the beginning of my work to try and explain the needs of a blind parent so that they can independantly look after their baby as well as looking good for those sighted that enter it. Most families aren't all blind or disabled, so thinking of the others involved is always needed.
I used an old Ikea Bookcase/Shelving unit to store baby supplies as the baby was 11 weeks premature and coming home a month before the mother's due date. Their funding to create a nursery was not ready for them. This unit is in the corner of the window across from the twin bed. On the shelving are various sized and shapes baskets that are made from different types of reeds and grasses. Each basket has a purpose. Why is this? Many baby products are found in identical bottle shapes so they are marked with various raised sticky items. But these can be lost or loose and become dangerous to a baby if they come off. To correct this issue we used a basket to hold items for a specific purpose. You can go to the bookcase and remove a basket with all the diapering items that are needed, another under the change table holds diapers, another basket under the change table holds dirty laundry. The drawers hold clothing, sleepers in the top draw, shirts in the second, pants in the third, the last held extra baby blankets and burp cloths.
Yet more baskets would hold bathing supplies. Socks and hats in another basket. Medical things like thermometer, baby nail clippers, baby Tylenol drops, and gripe water.
Everything is neatly out of sight, but organized for easy access with or without sight. They found that when a pair of dirty socks or other small items of clothing were taken off, it was easier to do laundry if they were added to a lingerie bag that zips up. Across the closet hanging on the wall was a diaper bag which we used to hold the lingerie bag and extra diaper cream.
Above the crib is a small light that would not wake the baby, but give a sighted person enough light to change a diaper or check on the baby.
The twin bed worked great when the baby was sick, a person could nap and keep an eye on them. Later the bed became a place to store extra bedding, too large clothes, out of season clothing and the baby can use it.
Toys to distract the baby were in the diaper bag and there were teddy bears on the shelf with the lamp above the crib for baby to look at. The lamp was actually attached to the wall so that it could not fall into the crib or be accidentally knocked over.
Concerns with baby blankets within the crib were quickly ended with a simple fitted sheet and a sleeping bag. It's a bag that has a zipper down the front, arm holes and an opening for the baby's head. The come in different sizes so that they will always fit the your baby.
Most of this is common sense, but it adds up to a lot of pleasure and happiness that might not exist without it's help.
The twin bed they already had and has four drawers which held bedding and clothing that had been given to them that was far too large when they recieved it. Later they will be large enough to hold the baby's clothing.
The crib was put together without the wheels so that it wouldn't "get away" on the blind parent. Note: Canadian cribs are no longer allowed to have pull down sides. The blind parent found the pull down sides difficult to use and the crib was left with the side up, however the crib did change into a child's bed so that they could transition the child to the twin bed over time. This helped with crib withdrawal.
They even found a diaper service that allowed them to use cloth diapers without a single diaper pin ever entering the house. They found fewer diaper rashes with the cloth diapers than disposable diapers. They also found that the diaper service worked right up to the end of diaper training and at least the first year was cheaper per month than disposable diapers. This was an important decision to them as they were finanically limited while trying to work out problems with their finanical assistance as no one expected such a sudden arrival.
As you can see the closet, in it was kept a night stand which they used to hold extra diapers and they kept the stroller there. Note: For the blind parent they found a bar style handle on the stroller made it easier to walk together as the blind parent could follow by holding the handle also. They went through three strollers until they worked out what they needed. Large wheels for winter, bar handle with two drink holders (never put hot drinks on a stroller if they tip the child could be hurt), a large storage area to help hold baby's things and medications for the blind parent.
Note: Have a space to house duplicates of favorite toys so that they are easy to switch out for easy cleaning often. (Favorite toys get dirty and harbour germs, babies often chew on them, if you don't switch them out often enough the baby may not accept the "other" favorite toy.)
Feeding the baby was interesting as the blind parent did want to help. When they had to use bottles, they would wash up the bottles and put them in the mircowave to serilize. They didn't have access to a dishwasher.(Note: not all dishwashers get hot enough to sterilize.) Boiling the bottles would not be a practical idea for the blind parent. Microwave sterilization was the most practical for them.
Two plastic containers were used to house washed versus sterilized bottle pieces. They would wash these out every day with soap and hot water. There were problems with this system when people from outside the family came in to help. The government was trying to help by providing paid help for them, however, it was expressed to me that these people were unsure how to help and often mixed up their system causing confusion and second guessing what was where.
If someone is to come into the home, have a written system for them and if the help doesn't work for your don't worry about ending it. This stress made it difficult for the new family to function easily.
For now this is it. I'll draw a few perspectives of the nursery so that colour schemes and theme can be seen and post them later.
Happy New Year One and All
Sunday, December 26, 2010
A Christmas/Boxing Day Miracle
We had an excellent surprise this morning when we found an extra deposit from the Provencial Government which just happened to be enough to replace the only camera we had that was broken just before Christmas Eve.
This meant that I got a camera to catch the last of our family's festivities that we can make.
I'll be able to continue posting my portfolio on behance too. I'll have a camera to use for school too.
Yeah!!! I love to take my own photos of things I find that inspire me. So keep posted on what's going on.
Monday I'll start the documentation about the Textural Nursery and begin posting about it by Wednesday.
My camera should be safe now also, because my son Ben got his first camera. I'm trying to figure out how to use his camera to save some of his photos and accidentally lost a few photos. Thank goodness it's no hard ship for Ben.
HAPPY HOLIDAYS EVERYONE!!!
Saturday, December 25, 2010
Turley Christmas Baking
Well this is a post on the work that's been taken me away from organizing my portfolio, etc.


I'm going to post a recipe for a dessert that my mother called, "Strawberry Dessert" I know it comes from Kraft because everything that is used is from Kraft. The recipe is so old that Cool Whip didn't exist when it was first printed. I've seen this recipe with Cool Whip and have tried it. I prefer real whipped cream and fresh sliced strawberries though.
 This is a perfect dessert for after a heavy meal as it's light, but rich enough in taste not to fall flat after a great meal.
Strawberry Dessert
1 fresh angel food cake torn up (don't use stale stuff in this recipe)
1 pound fresh or frozen(drained) strawberries
1 pkg of strawberry jello(sugar-free works too
2 cups whipping cream
Topping:
1/2 cup whipping cream
1 tsp vanilla
2 tbl sugar or splenda
Step 1: Take jello powder and add it to 1 1/2 cups HOT water. (Do not follow jello directions. Add no cold water.) Place in refridgerator. Do not let jello solidify. It is needed as it's beginning to thicken.
Step 2: Whip 2 cups whipping cream until stiff.
Step 3: You will know when the jello is thick enough as a small amount sticks to the side of the bowl. While you wait, in a serving dish add a layer of angel food cake and then a layer of randomly placed strawberries.
Step 4: When jello is ready fold it into the whipped cream and a layer of it. Repeat layers until serving bowl is full. I often have left over angel food cake.
Step 5: Chill for 1 to 2 days.
Step 6: Before serving whip the 1/2 cup of whipping cream until stiff, add vanilla and sugar.
Step 7: Decorate dish with whipped cream and add decorations (Strawberry slices, Chocolate Chips, Chocolate shavings, cocoa powder, sprinkles, nuts. Really whatever you believe will work for the crowd you're serving.)
Step 8: Serve and enjoy. This recipe even has picky eaters coming back for seconds.
Note: Now with all the jello flavours on the market, you can play with the fruit also. Try to stay with berries or fruit that stays firm over time. This recipe does freeze also for short periods of time. But I don't recommend doing this though, sometimes the jello will divide from the whipping cream if it's not set properly.
Butterscotch Squares
1 cup Peanut Butter
2 tbl Margarine/Butter
1 cup Butterscotch Chips
2 cups Mini Marshmallows
1/4 cup Crushed Salted Peanuts
In a double boiler, melt Margarine, Peanut Butter, and Butterscotch Chips until smooth. Combine Peanuts. Add Marshmallows and stir constantly until the marshmallows have melted and combined. Take off heat and tip into an 8" x 8" baking pan, use back of a spoon or fork and press firmly into pan. Refrigerate over night. Cut into squares.
Traditional Gingerbread Cookies
Recipe from www.allrecipes.com contributed by Joyce Johnson
3 1/2 cups all-purpose flour
1 1/2 tsp ground ginger
1 1/2 tsp ground cinnamon
1/4 tsp salt
1/2 cup white sugar
1/2 cup shortening
1 large egg
1 cup molasses
1 tsp baking soda
1 1/2 tsp warm water
1/4 cup raisins for decorating
1. In large bowl, cream shortening, sugar, egg and warmed molasses. Dissolve baking soda in warm water and add to egg mixture. Beat until smooth. Mix in flour, spices and salt until well blended. Cover and chill for 24 hours.
2. Preheat oven to 350 degrees F. Grease cookie sheets. Roll out dough to a thickness of 1/4 inch on a floured surface. Cut out gingerbread men using cookie cutters and place 2 inches apart on cookie sheets. Use raisins to make eyes, noses and buttons.
3. Bake 10 to 12 minutes in the preheated oven, or until firm. Let cool on wire racks.
Short Bread Cookies
4 1/2 cups Flour (Best results use Blending Flour that's commonly used to make gravy.)
2 1/2 cups Butter (Don't use margarine here, it's just horrid.)
1/4 cup Rice Flour
1/4 cup Quick Dissolve (Fruit) Sugar or Splenda
1 tsp Vanilla
Bring butter to room temperature and blend until smooth. Combine sugar, rice flour, and vanilla. Slowly add flour. Work the dough as little as possible, it's crumbly and you may need the warmth of your hands to soften the butter further for the dough to combine properly. Decorate cookies as you like, if using decorative sugars, sprinkles, raisins, or chocolate chips decorate before baking. Bake at 350 degrees for 30-45 minutes. Altitude and your stove type will affect the baking time. Watch for the bottoms of the cookies to begin to lightly brown and then remove from stove and place baking racks to cool.
Rocky Road Cookies
10 Graham wafers
1 cup Semi-Sweet Chocolate Chips
1/2 cup Margarine
1 Large Egg
1 cup Icing Sugar
2 cups Mini Marshmallows
1/2 cup Chopped Walnuts
Line an 8" x 8" square baking pan with graham wafers, cutting to fit pan. Combine chocolate chips, margarine and egg in sauce pan. Stir over medium heat until melted & smooth. Remove from heat. Stir in icing sugar. Cool slightly. Stir in marshmallows. Spread evenly over wafers in pan. Sprinkle with nuts, press down gently. Chill until firm. Cut into bars. Store, covered in the refrigerator. Makes about 20 bars.
I hope some of you will try these recipes and enjoy them. I know they aren't chef worthy, but they are home baked worthy.

Here's a simple plate from left to right, Butterscotch Squares, Gingerbread (Grandma's), Traditional Short Bread, and Rocky Road Squares

My traditional soft ginger bread in the making.
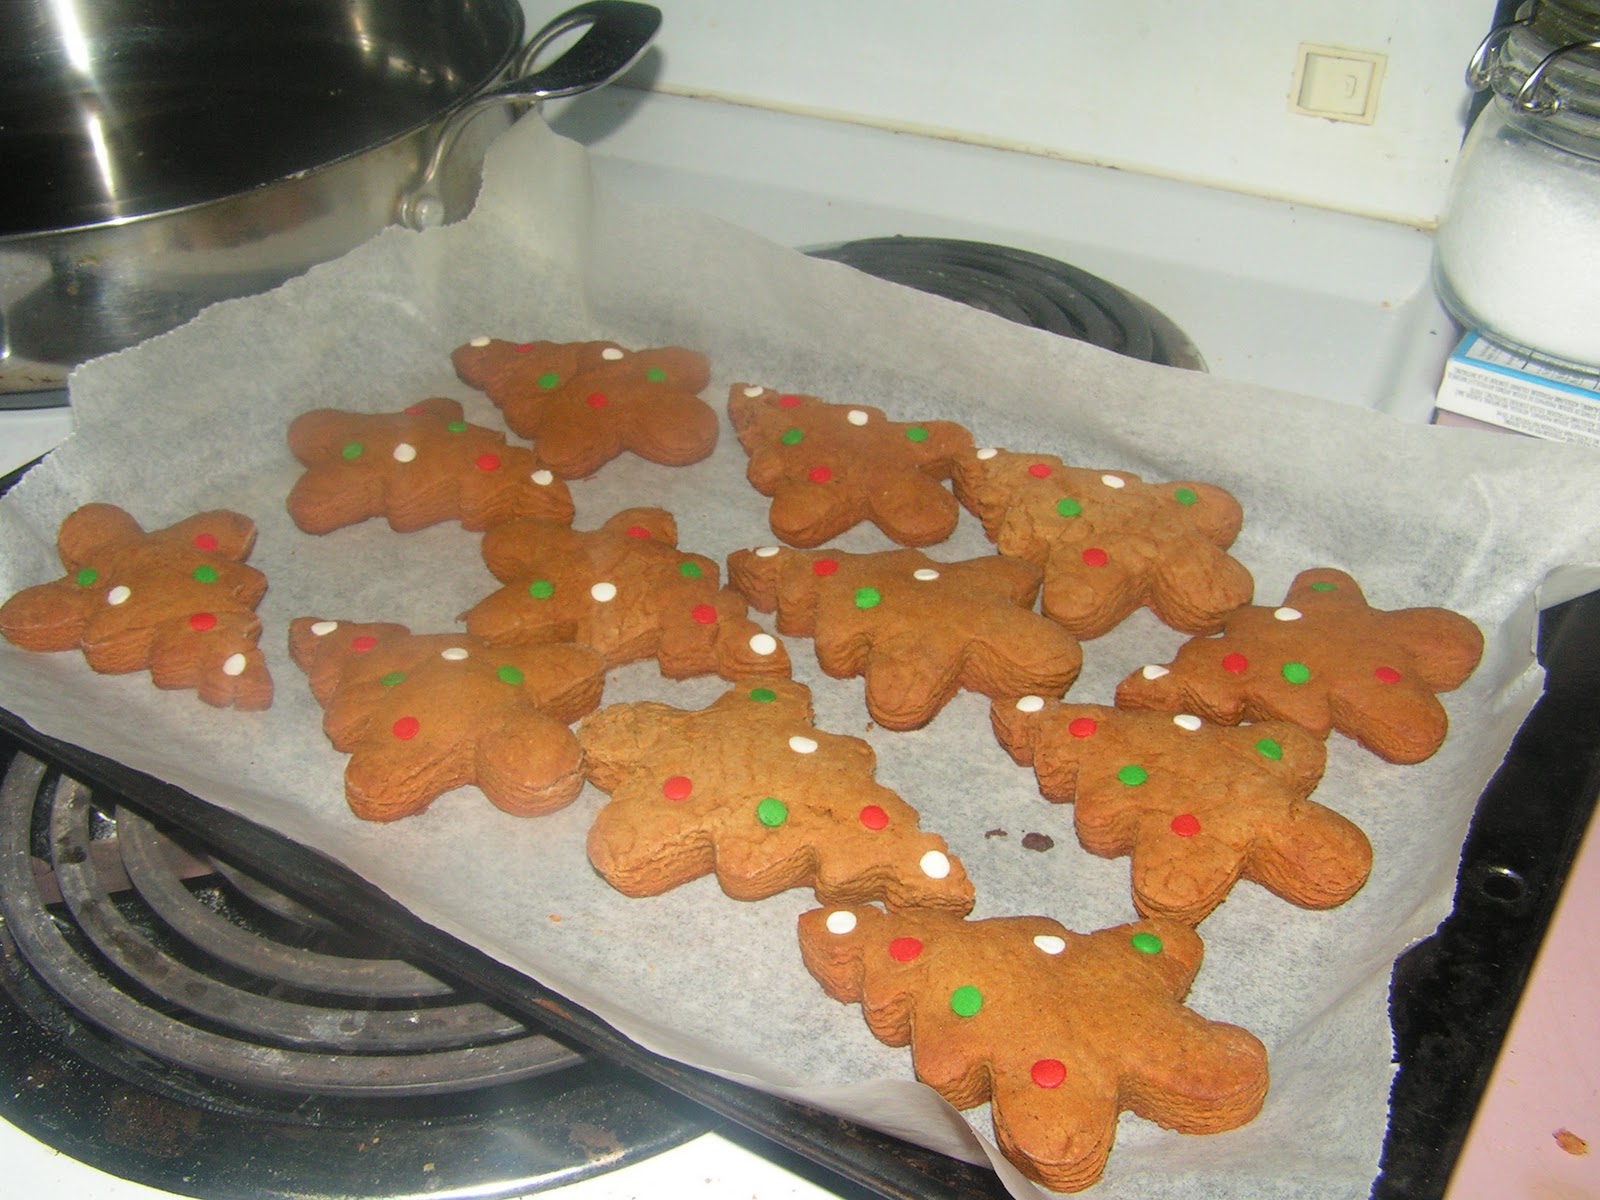
Homemade ginger bread Christmas Trees, my version.

Grandma claims to use the same recipe as I do, so I'm not sure why hers is thin and crispy, while mine are fluffy and soft.
Most of these recipes come from my mother's old recipe cards. My grandmother couldn't cook or bake if her life depended on it, she fried everything when she cooked and she never baked. My mother learned to bake at school and then from trial and error with recipes. I vaguely remember her using alot of Kraft Recipes so the squares may be found on the Kraft Recipe site. I know that the recipe she used for short bread actually came from a Club House Recipe years ago.
I'm going to post a recipe for a dessert that my mother called, "Strawberry Dessert" I know it comes from Kraft because everything that is used is from Kraft. The recipe is so old that Cool Whip didn't exist when it was first printed. I've seen this recipe with Cool Whip and have tried it. I prefer real whipped cream and fresh sliced strawberries though.

Strawberry Dessert
1 fresh angel food cake torn up (don't use stale stuff in this recipe)
1 pound fresh or frozen(drained) strawberries
1 pkg of strawberry jello(sugar-free works too
2 cups whipping cream
Topping:
1/2 cup whipping cream
1 tsp vanilla
2 tbl sugar or splenda
Step 1: Take jello powder and add it to 1 1/2 cups HOT water. (Do not follow jello directions. Add no cold water.) Place in refridgerator. Do not let jello solidify. It is needed as it's beginning to thicken.
Step 2: Whip 2 cups whipping cream until stiff.
Step 3: You will know when the jello is thick enough as a small amount sticks to the side of the bowl. While you wait, in a serving dish add a layer of angel food cake and then a layer of randomly placed strawberries.
Step 4: When jello is ready fold it into the whipped cream and a layer of it. Repeat layers until serving bowl is full. I often have left over angel food cake.
Step 5: Chill for 1 to 2 days.
Step 6: Before serving whip the 1/2 cup of whipping cream until stiff, add vanilla and sugar.
Step 7: Decorate dish with whipped cream and add decorations (Strawberry slices, Chocolate Chips, Chocolate shavings, cocoa powder, sprinkles, nuts. Really whatever you believe will work for the crowd you're serving.)
Step 8: Serve and enjoy. This recipe even has picky eaters coming back for seconds.
Note: Now with all the jello flavours on the market, you can play with the fruit also. Try to stay with berries or fruit that stays firm over time. This recipe does freeze also for short periods of time. But I don't recommend doing this though, sometimes the jello will divide from the whipping cream if it's not set properly.
Butterscotch Squares
1 cup Peanut Butter
2 tbl Margarine/Butter
1 cup Butterscotch Chips
2 cups Mini Marshmallows
1/4 cup Crushed Salted Peanuts
In a double boiler, melt Margarine, Peanut Butter, and Butterscotch Chips until smooth. Combine Peanuts. Add Marshmallows and stir constantly until the marshmallows have melted and combined. Take off heat and tip into an 8" x 8" baking pan, use back of a spoon or fork and press firmly into pan. Refrigerate over night. Cut into squares.
Traditional Gingerbread Cookies
Recipe from www.allrecipes.com contributed by Joyce Johnson
3 1/2 cups all-purpose flour
1 1/2 tsp ground ginger
1 1/2 tsp ground cinnamon
1/4 tsp salt
1/2 cup white sugar
1/2 cup shortening
1 large egg
1 cup molasses
1 tsp baking soda
1 1/2 tsp warm water
1/4 cup raisins for decorating
1. In large bowl, cream shortening, sugar, egg and warmed molasses. Dissolve baking soda in warm water and add to egg mixture. Beat until smooth. Mix in flour, spices and salt until well blended. Cover and chill for 24 hours.
2. Preheat oven to 350 degrees F. Grease cookie sheets. Roll out dough to a thickness of 1/4 inch on a floured surface. Cut out gingerbread men using cookie cutters and place 2 inches apart on cookie sheets. Use raisins to make eyes, noses and buttons.
3. Bake 10 to 12 minutes in the preheated oven, or until firm. Let cool on wire racks.
Short Bread Cookies
4 1/2 cups Flour (Best results use Blending Flour that's commonly used to make gravy.)
2 1/2 cups Butter (Don't use margarine here, it's just horrid.)
1/4 cup Rice Flour
1/4 cup Quick Dissolve (Fruit) Sugar or Splenda
1 tsp Vanilla
Bring butter to room temperature and blend until smooth. Combine sugar, rice flour, and vanilla. Slowly add flour. Work the dough as little as possible, it's crumbly and you may need the warmth of your hands to soften the butter further for the dough to combine properly. Decorate cookies as you like, if using decorative sugars, sprinkles, raisins, or chocolate chips decorate before baking. Bake at 350 degrees for 30-45 minutes. Altitude and your stove type will affect the baking time. Watch for the bottoms of the cookies to begin to lightly brown and then remove from stove and place baking racks to cool.
Rocky Road Cookies
10 Graham wafers
1 cup Semi-Sweet Chocolate Chips
1/2 cup Margarine
1 Large Egg
1 cup Icing Sugar
2 cups Mini Marshmallows
1/2 cup Chopped Walnuts
Line an 8" x 8" square baking pan with graham wafers, cutting to fit pan. Combine chocolate chips, margarine and egg in sauce pan. Stir over medium heat until melted & smooth. Remove from heat. Stir in icing sugar. Cool slightly. Stir in marshmallows. Spread evenly over wafers in pan. Sprinkle with nuts, press down gently. Chill until firm. Cut into bars. Store, covered in the refrigerator. Makes about 20 bars.
I hope some of you will try these recipes and enjoy them. I know they aren't chef worthy, but they are home baked worthy.
Thursday, December 23, 2010
Disaster Camera is Now Broken
Well baking is over, but in the process of photographing some of my baking so there are pictures for my recipe post. Ben decided he wanted the camera and dropped it on the floor. Now the battery section won't close so I'm keeping it shut with duct tape. Yes, every Canadian has a roll of duct tape somewhere in the house.
Now it's too late to get a new camera for Christmas or Boxing Day. So my portfolio is going to have to wait to get published fully to the net. I am so disappointed.
I need the camera for my school work and my portfolio presentation so I'm just hoping the camera still functions as I need it to.
I'm going to make sure my mother-in-law brings her camera to the dinner and lunch so we at least have some family photos.
Subscribe to:
Comments (Atom)